
A few years back, I spent an entire Saturday afternoon trying to get WordPress running on my first hosting account. I downloaded WordPress as a zip file, tried uploading it through some FTP client I barely understood, and ended up with a half-broken site that just showed a blank white screen. Classic “White Screen of Death.” I almost gave up and considered just sticking to Blogger.
Fast forward to now — I host most of my sites on Hostinger, and installing WordPress takes me less time than making a cup of tea. Literally. The whole thing is built into their dashboard now, and you don’t need to touch FTP, cPanel file managers, or any of that old-school stuff unless you really want to.
If you’re about to start a blog, a portfolio site, or even a small business website and you’ve picked Hostinger (or you’re thinking about it), this guide walks you through exactly what I do every time I set up a new site. No fluff, no “just click install” without showing you where that button actually is.
Why I Stick With Hostinger for This
I’m not going to pretend Hostinger is the only good option out there. Bluehost, SiteGround, and a bunch of others also offer one-click WordPress installs. But Hostinger has a few things going for it that made me stick around:
The pricing is genuinely affordable, especially for beginners who don’t want to commit a lot of money before knowing if their site idea will even work. Their hPanel (their version of cPanel) is simple enough that I’ve recommended it to non-techy friends without getting a dozen confused messages afterward. And the WordPress installer is fast — like, your site is live in under five minutes kind of fast.
Okay, enough background. Let’s get into the actual steps.
Step 1: Sign Up and Pick a Hosting Plan
Before you can install anything, you need a Hostinger account and an active hosting plan. Go to Hostinger’s website and pick a plan based on what you’re building.
For a personal blog or a small business site, their basic shared hosting plans are honestly more than enough. I started with their cheapest plan for my first travel blog, and it handled a few thousand visitors a month without breaking a sweat.
If you’re planning something bigger — like an online store with WooCommerce — you might want to go for one of their higher-tier plans with more resources. But don’t overthink this at the start. You can always upgrade later.
Step 2: Connect (or Buy) Your Domain
During checkout, Hostinger usually offers a free domain for the first year if you go with an annual plan. If you already own a domain from somewhere else (like Namecheap or GoDaddy), don’t worry — you can still use it.
I made the mistake once of buying a domain separately from my hosting and then spending way too long figuring out how to point it to Hostinger’s nameservers. If you’re buying fresh, just get the domain directly through Hostinger during signup. It saves you a step and a headache.
If your domain is elsewhere, you’ll need to update the nameservers later (Hostinger gives you these in your hPanel under the “Domains” section), but that’s a separate topic — let’s focus on WordPress for now.
Step 3: Log In to hPanel
Once your account is set up, log in to your Hostinger account and head to hPanel — this is basically your control room for everything related to your hosting.
The dashboard layout has changed a bit over the years (Hostinger updates their UI fairly often), but the core sections stay pretty similar: Websites, Domains, Emails, Hosting, and so on.
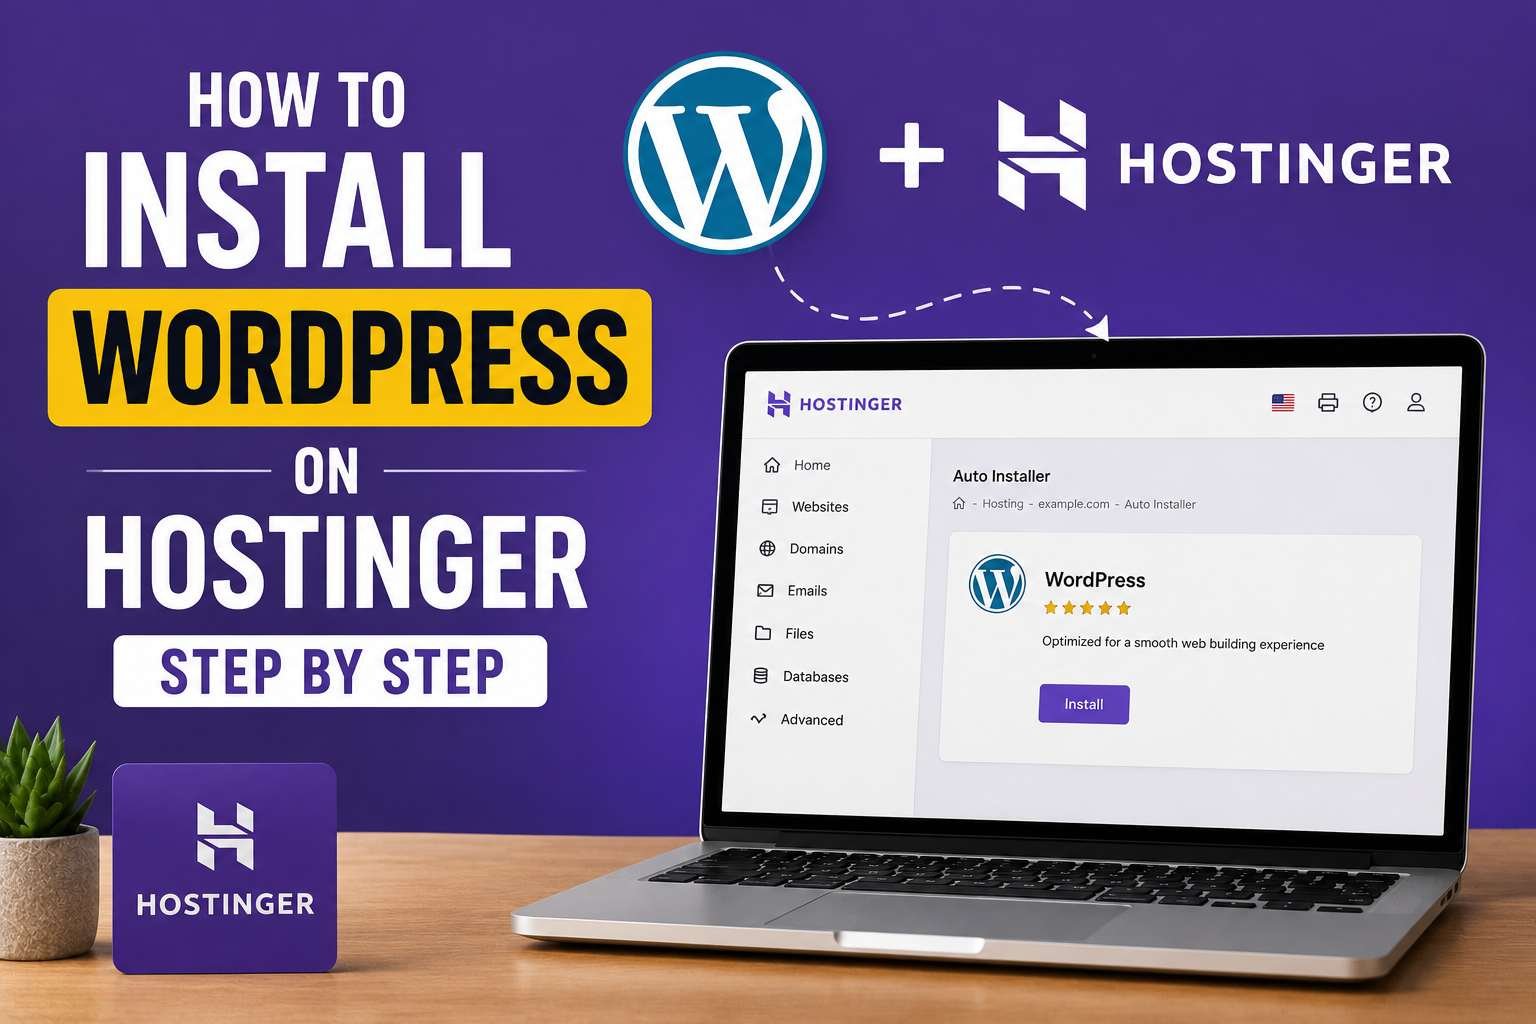
Step 4: Start the WordPress Installation
Here’s where the magic happens.
- From your hPanel dashboard, look for a section called “Websites” or “Auto Installer” — sometimes it’s right on the main screen as a big “Add Website” or “Create Website” button.
- Click on it, and you’ll usually be asked what kind of site you want to build. Choose WordPress.
- Hostinger will then ask for a few basic details:
- Your website’s title (you can change this later, so don’t stress over it)
- An admin username (please, for the love of everything, don’t leave it as “admin” — more on that below)
- A strong admin password
- Your admin email address
- Pick the domain you want to install WordPress on. If you have multiple domains connected to your account, double-check you’re choosing the right one. I once installed a test site on my main domain by mistake and had to clean it up afterward — not fun.
- Hit “Install” or “Continue”, and that’s basically it. Hostinger handles the database creation, file setup, and configuration automatically in the background.
Within a couple of minutes (sometimes even less), your WordPress site is live.
Step 5: Log In to Your WordPress Dashboard
Once the install finishes, you’ll get a link to your WordPress admin panel — usually something like yourdomain.com/wp-admin.
Use the username and password you set during installation to log in. If you forget to write these down (I’ve done this more times than I’d like to admit), Hostinger also shows your WordPress credentials inside hPanel under the “Websites” section, so you’re not totally locked out.
Once you’re in, you’ll see the familiar WordPress dashboard — the same one used by millions of sites worldwide. From here, you can install themes, add plugins, write posts, and basically build whatever you have in mind.
Step 6: Set Up SSL (Don’t Skip This One)
This is something a lot of beginners overlook, and I get it — SSL sounds technical and scary. But it’s just the thing that makes your site show that little padlock icon and “https” instead of “http” in the browser.
In hPanel, go to the SSL section under your website settings. Hostinger usually provides a free SSL certificate (often through Let’s Encrypt) and it auto-installs within a few minutes to a few hours after your site goes live.
Without SSL, browsers like Chrome will flag your site as “Not Secure,” which honestly makes visitors bounce immediately. I learned this the hard way with a client site that lost a chunk of its traffic simply because the SSL hadn’t activated yet and people didn’t trust the warning message.
Step 7: Install a Theme and Essential Plugins
Now that WordPress is technically “installed,” it’s time to make it look like an actual website instead of the default WordPress starter theme (which, let’s be honest, looks pretty bland).
From your WordPress dashboard:
- Go to Appearance > Themes to browse and install a free theme. Astra and GeneratePress are two I personally use a lot — they’re lightweight and don’t slow your site down.
- Go to Plugins > Add New to install the basics. For most sites, I install:
- Rank Math or Yoast SEO for search engine optimization
- WP Rocket or a free caching plugin for speed
- Wordfence or similar for security
- UpdraftPlus for backups (because trust me, you’ll want backups someday)
Don’t go overboard with plugins, though. I once inherited a site that had over 40 plugins installed, and it took forever to load. More plugins isn’t always better — only install what you actually need.
Common Mistakes I See (and Made Myself)
Using “admin” as your username. This is one of the first things hackers try when attempting to break into a WordPress site. Always choose something unique.
Forgetting to delete demo content. Most WordPress installs come with a sample post, page, and comment. They’re harmless, but cleaning them up makes your site look more professional from day one.
Not setting up backups early. I learned this lesson after accidentally breaking a site while testing a plugin update, with no recent backup to fall back on. Took me almost two days to manually rebuild parts of it.
Ignoring the “Search Engine Visibility” setting. Under Settings > Reading in WordPress, there’s a checkbox that says “Discourage search engines from indexing this site.” If you’re building a live website (not a test), make sure this is unchecked — otherwise Google won’t find your site at all.
Choosing a domain and then changing your mind a week later. Domain changes after launch can mess with your SEO and any links you’ve already shared. Try to settle on your domain name before you start building.
A Quick Real-World Example
When I set up a site for a friend’s small bakery business, the entire process — from buying the Hostinger plan to having a live WordPress site with a theme installed — took about 25 minutes. Most of that time was spent picking a theme and writing the “About Us” page, not on the technical installation itself.
That’s the part that surprised me most when I first switched to Hostinger. The technical setup, which used to eat up my entire afternoon with manual installs, now barely takes any time at all. The real work shifts to content, design, and actually growing the site — which is where your energy should go anyway.
Final Thoughts
If you’ve been putting off starting your website because the “technical setup” part feels intimidating, I get it — I felt the same way years ago. But with Hostinger’s one-click installer, that part of the journey is genuinely one of the easiest steps in the whole process.
Take your time picking a good theme, set up your SSL and backups early, and don’t stress too much about getting every setting perfect on day one. WordPress is flexible enough that you can change almost everything later as you figure out what works for your site.
And if something does go wrong along the way — don’t panic. Hostinger’s live chat support has talked me through more than one late-night “why isn’t my site loading” moment, and chances are they can help you too.
